
Remove WooCommerce Product Description Step By Step Guide
Sometimes you may need to customize your WooCommerce core templates. or, you may need to add or delete some extra features in the website. It completely depends on your customers.
If you want to completely remove, Remove WooCommerce Product Description, Description Title, Additional Title, etc. Or if you want to display, Custom Taxonomy Filter, In Stock Or Out Of Stock message on your website, this article will help you.
Today, In this guide, I will show you, a bit of the WooCommerce functional solutions.
eg, Remove WooCommerce Product Description, Description Title, Additional Information Title, Change In Stock Or Out Of Stock Text In WooCommerce, Add Custom Taxonomy Filter WooCommerce, and more.
Without any confusion, WooCommerce is the most popular eCommerce plugin for WordPress websites.
It makes making and managing an online web store easy, with affordable levels of flexibility and a number of other important options like inventory and tax management, secure payments, and shipping integration systems.
WooCommerce is the hottest and flexible eCommerce plugin for WordPress and its integration permits you to incorporate each nice SEO worth and eCommerce ability.
If you’ve been keeping up with eCommerce trends, you might have heard that over the last few years, more and more people are doing their shopping online.
In 2018, approximately 1.8 billion people purchased their products online, and in this year Global retail e-commerce sales become $2.8 trillion. but, global e-retail sales are going to raise to up to $4.8 trillion by the Twenty-first century.
In one UK-based report, approximately 51% of UK consumers said they prefer shopping online. As an eCommerce business, it is an excellent moment and a great time to take your business online.
So, I will show step by step, remove WooCommerce product description, remove product description title, remove additional information title, Change In Stock Or Out Of Stock Text In WooCommerce, and more.
Let’s get started
1. Remove the product description Title
First, Remove the product description title
Open Your active theme or child theme function.php file and add the following code at the bottom of the function.php file.
add_filter( 'woocommerce_product_description_heading', 'remove_product_description_heading' );
function remove_product_description_heading() {
   return '';
}
After adding this code Save the changes to your file and Refresh the product page.
2. Change the product description title
Second, Change the product description title
Change the product description title add the following code at the bottom of the function.php file.
add_filter('woocommerce_product_description_heading', 'change_product_description_heading');
function change_product_description_heading() {
  return __('NEW TITLE HERE', 'woocommerce');
}
Save the changes and Refresh the product page, the description heading is gone. Look this function return __(‘NEW TITLE HERE’, ‘woocommerce’); so, You should replace a New Title.
3. Remove the additional information title
Third, Remove the additional information title
Remove the additional information title add the following code at the bottom of the active theme function.php file.
function remove_additional_information_heading() {
  return '';
}
add_filter( 'woocommerce_product_additional_information_heading', 'remove_additional_information_heading' );
4. Change the additional information title
Fourth, Change the additional information title
Change the additional information title add the following code at the bottom of the active theme function.php file.
function change_additional_information_heading() {
    return __('NEW TITLE HERE', 'woocommerce');
 }
add_filter( 'woocommerce_product_additional_information_heading', 'change_additional_information_heading' );
Look this function return __(‘NEW TITLE HERE’, ‘woocommerce’); so, You should replace a New Title.
How To Change In Stock Or Out Of Stock Text In WooCommerce
In this tutorial, I will show how to change In Stock Or Out of Stock text on a product page in the WooCommerce Website.
Add the following code to the bottom of the active theme functions.php file. You can change the Available! and Sold Out text to be everything you like:
/**
*
* Open active theme functions.php file and add following code
*
*/
add_filter( 'woocommerce_get_availability', 'custom_get_availability', 1, 2);
function custom_get_availability( $availability, $_product ) {
//change text "In Stock' to 'SPECIAL ORDER'
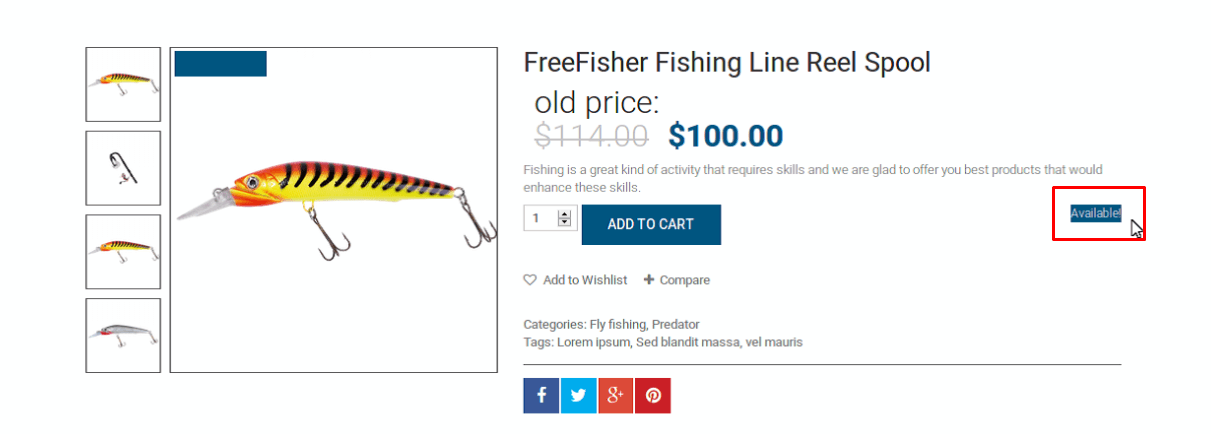
if ( $_product->is_in_stock() ) $availability['availability'] = __('AVAILABLE', 'woocommerce');
//change text "Out of Stock' to 'SOLD OUT'
if ( !$_product->is_in_stock() ) $availability['availability'] = __('SOLD OUT', 'woocommerce');
return $availability;
}
Save the changes and Refresh the Website. Look at the following images for the SOLD OUT message.

And Look at the following images for the AVAILABLE message.
You can do it using the WooCommerce free Plugin. To, Check the plugins for Change In Stock Or Out Of Stock Text In WooCommerce.
This function is not very complicated, so you should use the functions for this issue. Because there is a lot of plugins that can your website loading slow.
But on this website, you will get the best solutions to Optimize WordPress website and WooCommerce website.
How do you set stock quantity by default in WooCommerce?
Here’s the code snippet that you can make use of if you want to set stock quantity by default in WooCommerce for any newly added product Variations.
This code snippet can be favorable when bulk-adding variations and you don’t want an initial quantity of 0.
add_action( 'admin_enqueue_scripts', 'wc_default_variation_stock_quantity' );

function wc_default_variation_stock_quantity() {
  global $pagenow, $woocommerce;

  $default_stock_quantity = 0;
  $screen = get_current_screen();

  if ( ( $pagenow == 'post-new.php' || $pagenow == 'post.php' || $pagenow == 'edit.php' ) && $screen->post_type == 'product' ) {

    ob_start();
    ?>
    $('.woocommerce_variations').bind('woocommerce_variations_added',function() {
      $('.woocommerce_variations input').each(function(index,el) {
        el = $(el);
        if(el.attr('name') && el.attr('name').substr(0,14) == 'variable_stock' && el.val() == '') {
          el.val(<?php echo $default_stock_quantity; ?>);
        }
      });
    });
    <?php
    $javascript = ob_get_clean();
    $woocommerce->add_inline_js( $javascript );
  }
}
if you need a default stock quantity for WooCommerce simple products.
add_action( 'admin_enqueue_scripts', 'wc_default_variation_stock_quantity' );

function wc_default_variation_stock_quantity() {
  global $pagenow, $woocommerce;

  $default_stock_quantity = 0;
  $screen = get_current_screen();

  if ( ( $pagenow == 'post-new.php' || $pagenow == 'post.php' || $pagenow == 'edit.php' ) && $screen->post_type == 'product' ) {

    ob_start();
    ?>
    if ( '' === $( '#_stock' ).val() ) {
      $( '#_stock' ).val(<?php echo $default_stock_quantity; ?>);
    }
    <?php
    $javascript = ob_get_clean();
    $woocommerce->add_inline_js( $javascript );
  }
}
Ability to default stock quantity 1 when adding a product.
add_filter( 'wcfm_product_fields_stock', function( $stock_fields, $product_id, $product_type ) {
	if( !$product_id ) {
		if( isset( $stock_fields['manage_stock'] ) ) {
			$stock_fields['manage_stock']['dfvalue'] = 'enable';
		}
		if( isset( $stock_fields['stock_qty'] ) ) {
			$stock_fields['stock_qty']['value'] = 1;
		}
		if( isset( $stock_fields['sold_individually'] ) ) {
			$stock_fields['sold_individually']['dfvalue'] = 'enable';
		}
	}
  return $stock_fields;
}, 50, 3 );
Add Custom Taxonomy Filter WooCommerce Products Admin Dashboard
In this tutorial, I am going to show, Add Custom Taxonomy Filter WooCommerce Products Admin Dashboard.
This tutorial would be very little. So, add the following code in your active theme fucntions.php file.
add_filter( 'woocommerce_product_filters', 'wcf_filter_by_custom_taxonomy_dashboard_products' );

function wcf_filter_by_custom_taxonomy_dashboard_products( $output ) {

  global $wp_query;
  $output .= wc_product_dropdown_categories( array(
   'show_option_none' => 'Filter by product tag',
   'taxonomy' => 'product_tag',
   'name' => 'product_tag',
   'selected' => isset( $wp_query->query_vars['product_tag'] ) ? $wp_query->query_vars['product_tag'] : '',
  ) );

  return $output;
}
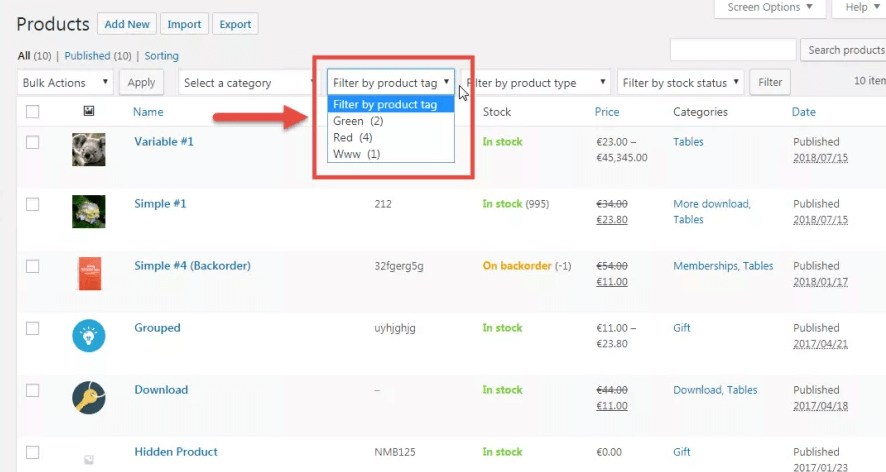
After Save, this code and go to the admin panel, and the WooCommerce products page should look like the following attached image.
Thank You for reading this article! if you follow the provided suggestions, you can fix your WooCommerce website Remove WooCommerce Product Description, Description Title, Additional Information, Stock Or Out Of Stock Text, Add Custom Taxonomy Filter WooCommerce.
Best Free Block Plugins for WordPress
After fixing, Remove WooCommerce Product Description, Out Of Stock Text, Custom Taxonomy Filter. Here some of the WordPress Best Free Block Plugins. These plugins can be useful for your WordPress website.
- Ultimate Blocks – Gutenberg Blocks Plugin
- Atomic Blocks – Gutenberg Blocks Collection
- Stackable – Page Builder Gutenberg Blocks
Conclusion
In the above article, I am trying to fix the WooCommerce website some of the problems.
Like: Remove WooCommerce Product Description, Change In Stock Or Out Of Stock Text In WooCommerce, Add Custom Taxonomy Filter WooCommerce, and more.
if you believe these solutions did not enough for you. Please comment below and please share this article.
Need Help to create an eCommerce website?
- Dropshipping website
- Full functional eCommerce website
- Affiliate Website
Kindly visit: Create a custom eCommerce website